
Saskia Glasfurd-Brown
Music Production & Sound Design
< BIODATA SONIFICATION >
BFM = biofeedback machine!
INTRODUCTION:
What is biofeedback?
We ourselves generate our own kind of biofeedback. From brain waves, heart beat, breathing and muscle contractions. All of these can be measured with specific equipment to get biofeedback. I am doing something very similar for my project, by measuring micro-current fluctuations, that occur on any plant leaf surface, my biofeedback machine can convert these tiny fluctuations into MIDI data, allowing us to "hear" the plant.
To build this biofeedback machine, I found a tutorial by electricityforprogress through a YouTube video by Felbify. You can view this here. The project instructions were over five years old. The instructions came with an entire detailed part list, and also instructed you where you can buy the parts. Along with a kit and instruction list, there was also a link to the code/sketch needed to make the BFM work. Also where you can download the correct libraries for the arduino sketch.
- THE BUILD -


Most of the parts required for the build I did not have, so I ordered the parts that I needed from DigiKey. After I had the required parts, I started the build.
Here is a list of everything I needed for the BFM:
-
Resistor 220 Ohm x7
-
Resistor 3.9k x1
-
Resistor 10k x1
-
Resistor 100k x1
-
Potentiometer 10k x1
-
Resistor 1k x1
-
Tactile Switch x1
-
Capacitor 4700pF
-
Electrolytic Cap 47uF
-
Electrolytic Cap 1uF
-
Capacitor 0.1uF x2
-
555 Timer IC x1
-
8 Pin Socket x1
-
3.5mm Stereo Jack x2
-
MIDI 5 pin DIN x1
-
Red 5mm LED x2
-
Yellow 5mm LED x1
-
Green 5mm LED x1
-
Blue 5mm LED x1
-
White 5mm LED x1
-
Arduino Uno x1
-
Breadboard x1
-
Electrode Leads and pads x2
-
Jumper wires x22
STEP 1:

First off, I connected the 555 timer to the bread board, making sure that it was the correct way round. The 555 timer has a small semi-circle at one end of the part, indicating it as the top of the piece.
Next, I insterted the 4700uF capacitor. This capacitor is a very tiny component with a very small value. It allows the 555 timer to work at a much faster rate, giving the galvanic conductance meter a high resolution.

STEP 2:

This is where I ran into my first problem when building the biofeedback machine. The next part I needed to attach was the 0.1uF capacitor. This part needed to be attached in the pin holes either side of the 555 timer. Unfortunately, the part I had ordered had very short pins and wouldn't stretch enough. To work around this, I attached the capacitor to two jumper wires, then attached those wires to the board. They basically act as extension wires.

My part

Part used in tutorial
After this, I then inserted the 100k and 220 Ohm resistors. These resistors are later used to limit the current driving the red LED.
STEP 3:

In step 3, I added the LEDs that indicate what is going on/how to operate the biofeed back machine. The single red LED flickers when ever it can sense signals coming through the electrodes. The five coloured LEDs act as a menu function, and when using the synth, light up when they are recieving an electronic signal.
STEP 4:

Next, the 220 Ohm resistors needed to be fitted, each resistor corresponded with an LED. The resistors were very tricky and fiddly to fit. Its recomended that you snip the wires so they dont protrude too much. Unfortunately, I didn't have wire cutters while I was building it.
Resistors are an electrical component that restrict the flow of electric current, without them, the LEDs would not power on.
STEP 5:

Then it was time to attach the MIDI pin connector. This would allow me to connect the biofeedback machine to my computer and use it within any DAW. This part had particularly small pins, which made it hard to seat properly. Furthermore, the pins didn't all line up correctly, so I had to bend them very carefully in order for them to fit.
After I had made these adjustments, the MIDI connector fitted securely in place.
STEP 6:
In step six, I attached the button, which acts as a menu switch/function button. This allows you to control threshold, note scale, MIDI channel and LED brightness.
Next, the 3.5mm jack input for the electrodes was connected. This allowed me to connect the electrode/tens cables to the biofeedback machine.

Electrode connector
STEP 7:

Next I connected the potentiometer. This part would work with the button and a menu scroll function. However, the potentiometer that I had had a different pin layout to the one used in the tutorial. This caused another problem as the potentiometer had to be fitted horizontally instead of vertically.

My part

Part used in tutorial
WORK AROUND:
To get around this, I connected each pin on the potentiometer with jumper wires, then connected that to the board.
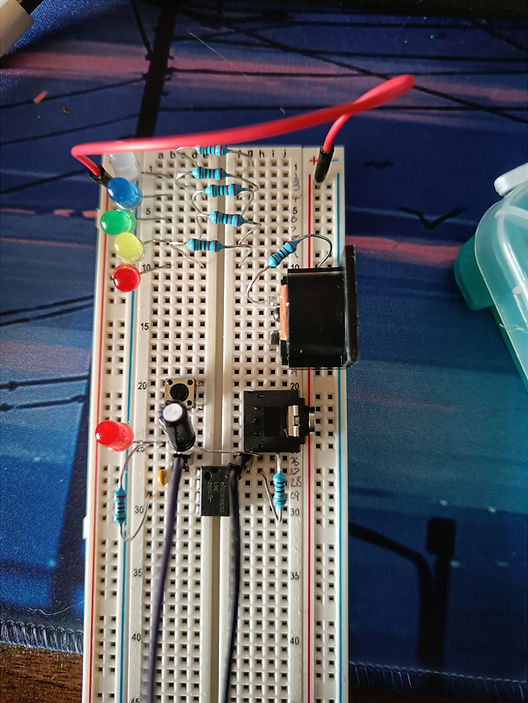
STEP 8:
All that was left to do was to wire everything up with jumper wires, and connect it all to the Arduino. A total of 22 jumper wires were used in the whole build. I had to make sure everything was seated correctly otherwise it wouldn't work.
FIRST TEST:
When I had completed the BFM, I tried running code provided in the tutorial and was met with several errors. This was because there was conflict between some of the libraries I had installed.
The sketch runs off Arduino's own software and is written in C++. It also required several specific libraries in order to run. Libraries are files written in C or C++ which provide extra functionality to the sketches. For example, my code required a library called LEDFader which made it so the LEDs on my BFM could fade in and out instead of being static.
Here is an example of this library working:
My main problem was with the EEPROMEx library. This library acted as a storage function, remembering parameters and preference settings even when the BFM is switched off. When running the sketch, I was met with this error:
C:\Users\Saskia\Documents\Arduino\libraries\EEPROMEx/EEPROMex.h:188:22: error: conflicting declaration 'EEPROMClassEx EEPROM'
extern EEPROMClassEx EEPROM;


In short, this error basically means that the libary wasn't initated properly, so wouldn't be able to carry out its function. To fix this, I went on the arduino community forum to see if anyone had the same problem. On the forum, I found a user saying to declare the library with '//' instead of using a hashtag. I made this change and this fixed the problem and the library was able to work correctly.

After I had fixed this, the code was still displaying errors which I could not figure out. So, I tried using the BFM without running the code on it, and this is what happened:
The synth worked first try! However, it would only play the note C at different octaves. I think this was because of the code failing to upload to the Arduino correctly. Furthermore, I couldn't get the menu function to work either. I should've been able to control note threshold, key and how sensitive I want the BFM to be. But what ever I tried I could not get it to work. This could be for a number of reasons, the code, not connecting the pins of the potentiometer to the breadboard correctly, or the part being broken.
My first trails were on people, because I originally didn't have a plant with big enough leaves, or one I didn't want getting damaged by the electrodes. Testing on people proved to be much more effective. This is because we have much stronger and fewer electrical signals in us compared to the plant.
Here is what it sounded like with just one person using it:
I also noticed it being far more reactive to people rather than plants
WHAT I WOULD DO DIFFERENTLY, AND WHY:
-
I could have done more thorough research into the parts I needed. Some of my parts were similar but did not work in the same way as the ones used in the tutorial.
-
Document build process more. I got ahead of myself and didn't take as many pictures of the build process as I could have.
-
The breadboard I used was twice as big as the one used in the tutorial, this made it tricky to move around. Also, my breadboard did not number all the connection holes, which made it hard to follow sometimes.
Even with all of these problems, I was still able to make a demo song with it. To make this song, I let the BFM record several different lengths of audio, trialing them on different people to see if I would get differnt variations of notes. Sometimes there would be long sections of slience where the BFM wouldn't pick up any signals at all. Othertimes, it was the complete opposite!

Here is the first demo I made, with layering all the different recordings:
I managed to fix this code problem by running an older version provided on electricty for progress' website. This then made the BFM play different notes which I was able to turn into a song.
FINAL PIECE:
To create the final song, I hooked the BFM up and left it recording MIDI into FL Studio. Recording the MIDI was a much better approach as this would let me change the sound/preset, creating different sounds for the melody. I had a brief idea of what kind of music I wanted to make with the synth. It definitely had to be atmospheric, I had recenly rewatched Interstellar, and wanted the music theme to feel the same. Here is some inspiration I had:

Special thanks to my Calathea plant, which has definitely seen better days
Here is what it sounded like:
I couldn't make an entire song only using the BFM, it sounded too random and I wanted the song to have some structure to it. So, using the pre-recorded MIDI notes, I made an arp that helps fill the song out a little. I wanted this to be in the background as the plant melody needed to be the lead element.
It also would make very quiet melodies, which I forgot to record as much. These are what I used for my song. I had to quantize a few notes to make it all correctly in key.
Final piece with album artwork:
Electricty for Progress. (2016). Getting Started using your Biodata Sonification Device. Available: https://electricityforprogress.com/getting-started-using-your-biodata-sonification-device/. Last accessed 1st May 2022.
Electricty for Progress. (2021). BioDataSonification Breadboard Kit. Available: https://github.com/electricityforprogress/BiodataSonificationBreadboardKit/tree/ac8b28a86406faa1d3ad3d88cac917c3296f4fc5. Last accessed 1st May 2022.
Mayoclinic. (2022). Biofeedback. Available: https://www.mayoclinic.org/tests-procedures/biofeedback/about/pac-20384664. Last accessed 1st May 2022.
BBC Bitesize. (2017). Resistors, lamps and diodes. Available: https://www.bbc.co.uk/bitesize/guides/zcgkp39/revision/1#:~:text=A%20resistor%20is%20an%20electrical,the%20potential%20difference%20across%20it.. Last accessed 25th April 2022.